AirTag Not Reachable problem commonly happens due to a dead battery in the AirTag, a Bluetooth cache problem in your iPhone or iPad, difficulty connecting to your Apple ID, or a faulty AirTag unit.
To fix it, you need to restart the iPhone, enable the Location settings, check the battery status of AirTag, try to reconnect the AirTag with your Apple ID, force close the Find My app, and try to connect again. Otherwise, you can also replace the AirTag battery, in case there is hardware damage, from Apple support.
Before that, let’s walk through the troubleshooting steps and how to connect an iPhone with an AirTag.
How to connect AirTag with your iPhone?
AirTag devices are Bluetooth trackers that can help you find wallets, keys, or even luggage by attaching them to these objects. Thus, you must complete the setup process and connect it to the Apple device.
AirTags come with Bluetooth 5.0 specifications and can be trackable within 800 m. So, to connect – Bring the AirTag near your iPhone, and a pop-up will appear. Tap on “Connect”, and your AirTag would automatically connect with your iPhone.
If there is more than one AirTag, then you might need to select the appropriate name from the list. Register the device on your Apple ID and Tap Finish.
4 Methods to Fix if AirTag Not Reachable
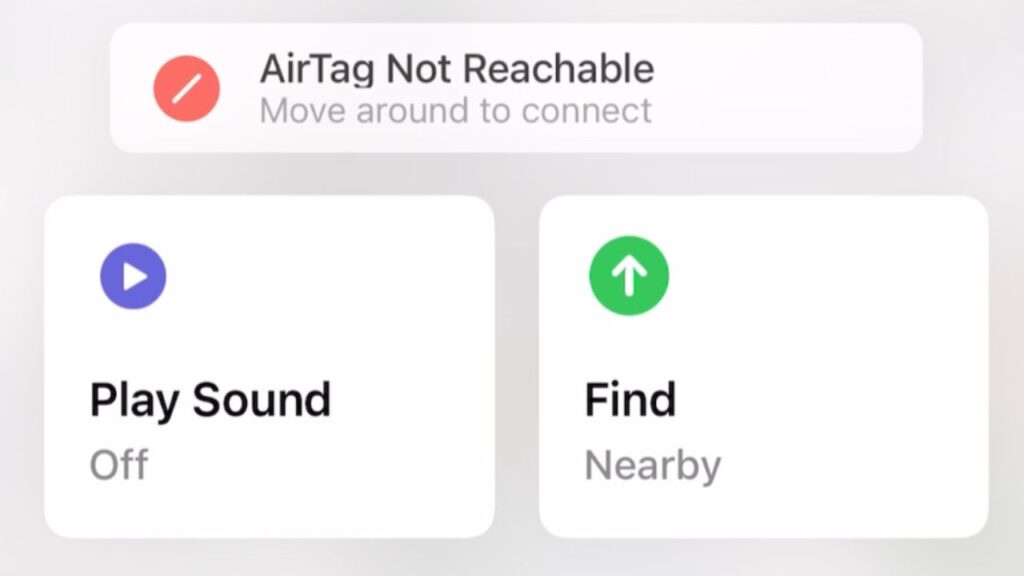
If the AirTag is not set properly, then an error is reported: “AirTag not reachable move around to connect”. This error can be reported when trying to play any audio file on your AirTag, even if you are devices 10 feet away. On the Find My app, you might see a red warning message that the AirTag is not reachable.
If your AirTag fails to connect or AirTag not reachable, then let’s get along with the steps that will help you to fix the error.
1. Restarting the iPhone or Apple device
This is considered to be the most basic method where you need to restart the iPhone. Simply press the Power button on the iPhone and tap the Power off option. Wait for a few minutes, and then turn it back on. Now, go to Find My app and notice the warning message. If it does not appear, then try to play an audio file, and this will ensure whether the bugs have been fixed.
2. Reconnect the AirTag with your Apple ID
AirTag has a feature to automatically connect with your iPhone through the iCloud account. So, you can try to remove the AirTag from your Apple ID and reconnect it again.
To disconnect – Go to Find My app on your iPhone and select Items. Next, look for the AirTag that you want to remove. If it is more than one, then select each of them and click on the Remove option. You need to confirm the notification whether you genuinely want to remove AirTag from Apple ID. Confirm your action, and your AirTag will be removed.
To reconnect – Place the AirTag close to your iPhone, and it will automatically get connected. A pop-up screen would appear on the iPhone, and you need to give permission to connect. Simply tap on Connect beside the AirTag name and now confirm whether the issue has been fixed.
3. Check the battery status of AirTag
AirTag comes with a replaceable battery feature. Apple claims that the AirTag battery can last for 1 year. So, check the battery status of the AirTag and try to fix the problem.
To check the battery status, open the application, Find My, and tap on Items. You will find the list of AirTags; select the one for which you want to check the battery status. Now, right below the name of the AirTag, you can see the battery status.
If you find the AirTag battery status has been drained, then you need to replace them by visiting any nearby Apple Store.
4. Try to Hard Reset your AirTag
If none of the above steps fix the problem, then try to hard reset your AirTag from the Find My app. You need to do this manually. You will find two sides of AirTag, one side has a white color, and the other has a stainless steel cover.
To proceed – Press the stainless steel side and rotate it counter-clockwise. Keep rotating until it reaches the end, and you can rotate no more. Now, take out the white side, remove the battery, wait for a few seconds, and put it back in its place. Check whether the battery has been seated properly and wait until you hear the clicking sound.
However, this doesn’t end here, and to factory reset, you must repeat the same process 4 more times, i.e., remove and put back the battery five times in total.
Put the stainless steel back in its position and ensure that the alignment is proper as you press it down. You will again hear a sound, now rotate the stainless steel side until it gets locked. Finally, bring your iPhone close to the AirTag, and when the popup button appears, select “Connect”.
How to ensure that your AirTag automatically connects with the Apple device?
Keep your Bluetooth on, and ensure that the AirTag is within the detectable range. Turn on the “Share my location” feature on your device, and also turn on “Find my device” and “Share last location”.
How to play a music file using AirTag?
AirTag comes with an in-built speaker that helps to play a sound after you connect it to the Apple device. To play a sound on AirTag, install the Find My app on your Apple device and go to the Items tab. From the list of AirTag devices, pick the one that you want to connect with. Now, select the Play Sound button. This should start playing the sound or music file that you want to play. If you want to stop the sound, tap the Stop Sound option.


