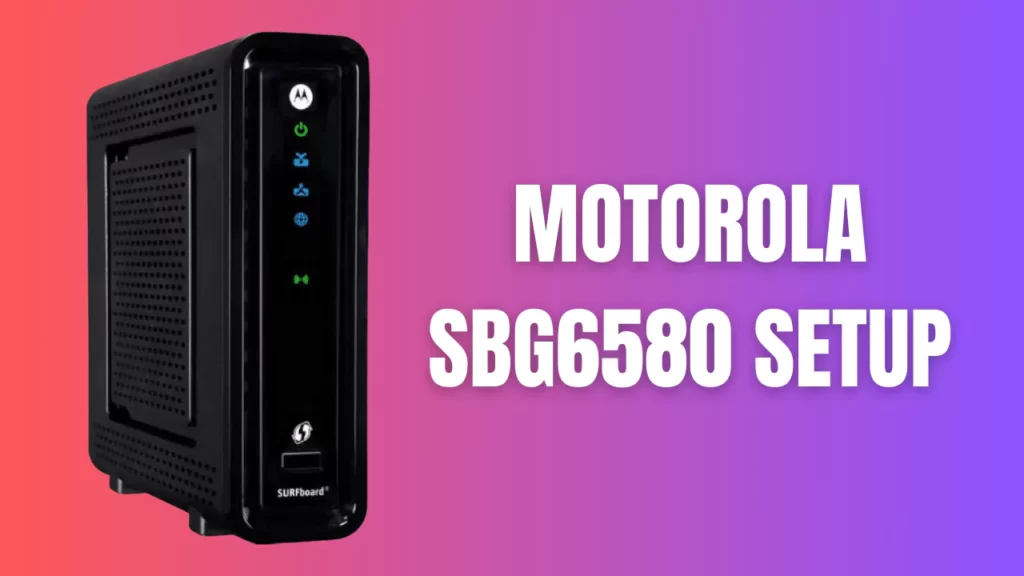
The Motorola SBG6580 setup process is easy and quick, and you have to connect the device to a power outlet, use the IP address, log in to the admin page, and then make the necessary changes. Set up a new username and password to keep the device secured, and you are good to go.
However, if you are a beginner, then you need to get to the details of the Motorola SBG6580 set up. Let’s walk you through this guide so that you can avoid unnecessary mistakes.
How to prepare the Motorola SBG6580 to proceed with the setup?
Before you set up the Motorola SBG6580 device, you need to go through a few initial processes that help you proceed with the device configuration.
Initial Process:
If this is your first-time installation process for Motorola SBG6580, then you need to check if certain items before the installation, such as:
- Verify whether the wall power socket is working perfectly.
- If there is wear and tear in the internet cable, then replace them.
- Check the software license and regulating card.
- Go through the support information card.
- Take a quick look at the quick start guide provided by Motorola manufacturers.
Additional Items:
Along with these items, you would also need certain additional things to access the Motorola gateway, such as:
- If the device is not connected to the wall outlet through cables, then you need a coaxial cable.
- You also need a splitter to create additional cable connections and include devices such as a smart TV or a setup box.
- If you want to connect any ethernet-enabled device, then you need an additional Ethernet cable.
System Requirement:
You also need to verify the system requirements for the installation, as you need a PC to conduct the configuration and set-up:
- Verify whether you have access to high-speed internet.
- You would need a web browser, such as Google Chrome, Internet Explorer, Firefox, or Safari. Motorola gateway setup is usually compatible with Windows 10, 8, 8.1, and 7 service packs.
- Other previous versions are not supported by Motorola as well as Microsoft Windows
- If you are using any other operating system, then you need a Macintosh 10.4 or higher version.
6 Step-by-Step Process of Motorola SBG6580 setup
Now, let’s get to the step-by-step process for Motorola installation:
Step 1
If the coaxial cable is not connected to the wall power outlet, then you need to connect it. Find the cable connector at the back side of the Motorola device and fingertight the connector so that the connection is stable. Also, it would help you to avoid any network damage.
Step 2
Take the ethernet cable and insert one end into the Ethernet port of the computer and the other end to the rear side of the Motorola device. Usually, the electrical power is not controlled by any switch, so if you plug the cable into the power outlet and turn on the wall switch, the Motorola device will get automatically powered on.
Step 3
Check whether the Motorola is getting stable power. The power LED lights will keep blinking for 15 seconds, and then it will get solid, which is an indication that the device is ready to proceed towards the installation process. You will also find that the Receive, Send, and Online LED lights will flash when the device is going through an initial startup.
Step 4
Now, get to the computer and, in any browser address bar, type in the IP address. Hit the Enter key and wait for the Motorola SBG6580 admin page to appear. Here, you have to enter the default password and username, which are usually present in the label pasted on the back side of the Motorola device. However, if no such label is present, then go through the user manual or contact the ISP.
Step 5
When you hit the Enter button after entering the login credentials, it will take you to the router admin page. Here, you get the option to change the login credentials, which are necessary for security reasons. So, get to the security tab and select Change Username and Password.
Go through the onscreen prompts, enter the new credentials in their respective field, and hit the Apply button. Make any other necessary changes in the administration or network settings that are necessary to enhance the performance. Finally, click on Apply and log out from the admin page.
Step 6
Now, it is time to verify your actions. Get back to the browser, enter the IP address in the address bar, hit the Enter button, and again, get to the admin login page of Motorola SBG6580. Enter the newly created password and username to access the administration. If you are able to successfully access the admin page, then it indicates that the setup process is complete.
What do the different LED icons on Motorola SBG6580 indicate?
You will find 5 LED icons named Power, Receive, Send, Online, and Wireless. Now, based on the blinking or solid LED lights, you can understand the functional condition of the router.
- If the power lights are blinking, then the device is in its initial stage. A solid green light indicates the device is connected to the power.
- The blinking Receive light indicates that a scanning is under process for a downstream channel connection, and a solid green light indicates a non-bonded downstream channel connection. If the lights are blue, then it indicates a high-speed internet connection with a bonded downstream channel.
- A blinking Send light indicates scanning for an upstream channel connection, and a solid green light indicates a non-bonded upstream channel connection. If the lights are blue, then it indicates a high-speed internet connection for the bonded upstream channel.
- If the online LED icon is blinking, it indicates the device is scanning for an Internet connection. If the light turns green solid, then it indicates the device has established a stable connection to the internet.
- A blinking green wireless LED icon indicates Wi-Fi enabled with encrypted wireless data activated. If the lights turn amber and start flashing, then it indicates the wireless wiring process is in progress. When the wireless LED lights turn solid green, it indicates that the device has established a wireless connection with Wi-Fi-enabled devices on the home networks, such as printers, tablets, and laptops.
How to enable Wireless mode for Motorola SBG6580?
To enable the Wireless mode for Motorola SBG6580, you need to get to Settings and select Wireless tab > Basic. Again, get back to the Wireless tab and select Primary Network. For both these tabs, you need to select the Enabled option, once beside the Wireless label and next beside the Primary Network label.


