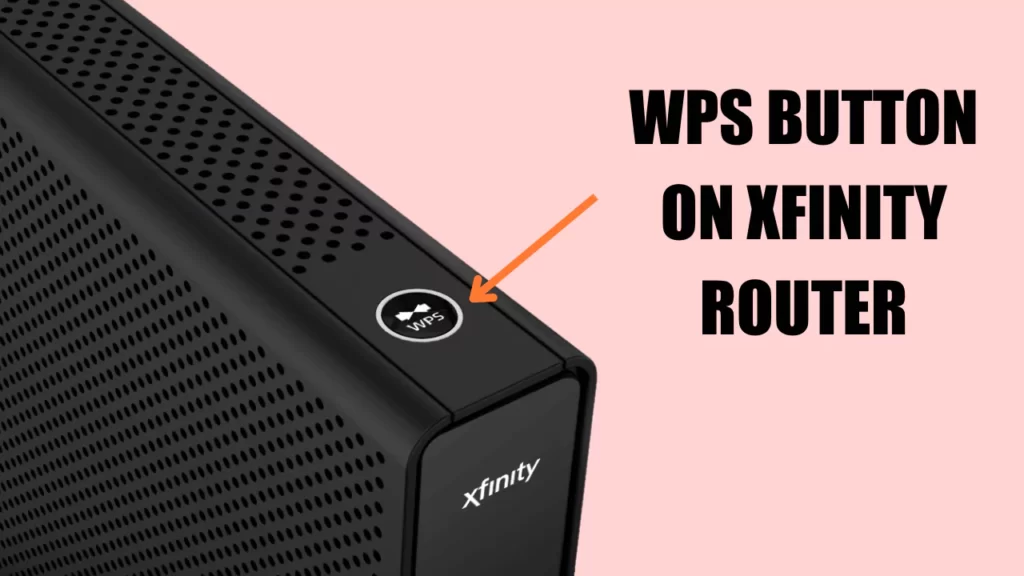
The WPS button on the Xfinity router helps in the setup process of the wireless networks. It stands for Wi-Fi Protected Setup, and with this feature, you can connect one or more devices to a secured network with just one press of the button.
Every latest-built Xfinity router comes with this WPS button, and with just a few steps, you can easily configure the feature. However, there are also certain pros and cons related to the WPS.
So, let’s get to the details and learn how to configure and bypass the cons generated by the WPS button.
What is WPS?
Wi-Fi Protected Setup, or WPS, is found in most of the latest routers, including Xfinity. It helps in the easy establishment of a wireless connection between the router and any device. With just a push of a button or using a Personal Identification Number (PIN), you can build a wireless connection.
You do not need to go through the communication protocol or device configuration manually. The WPS button will do all these tasks automatically. You can create a network connection between the router and the scanner or router to run the printer or router to the camera. Name a device, and the WPS button will help you to establish the connection.
What are the pros of using WPS?
WPS has been designed to make the setup process easier, and it comes with many other benefits:
- You can easily connect to any network with just a press of a button.
- With this feature, you can automatically configure the security network and the network name. You do not need to look for or memorize the network name, password or SSID (Service Set Identifier) to prepare a connection.
- WPS is secured, as every time you use it, a password is generated randomly, which can be used only one time.
- You do not need any pin for most of the setup as the feature is a push-button configuration.
What are the cons of using WPS?
Wi-Fi Protected Setup also comes with drawbacks such as:
- If there is a brute force attack using pin mode, then your security can be breached.
- If you are using the WPS feature, then all the devices that you are going to connect to the router should be WPS enabled.
- If the device that you are going to connect does not have the WPS feature, then it is worthless to buy an Xfinity router that comes with a WPS button.
Where is the WPS button located on the Xfinity Router?
Xfinity router has three gateways, and for each location, it has a WPS button:
Xfinity Wireless Gateway
Here, the button is located on the top of the gateway. It is easy to detect and can be activated when you press the WPS button. This action triggers a blinking light, and it can only be stopped after you connect any device to the router.
Xfinity xFi Advanced Gateway
On the left side of the Xfinity logo of the Xfinity xFi advanced gateway, you will find the WPS button. When you push the WPS button, it will show up blinking blue light. Now, when you are pairing the device with the router, you just have to press the button, and when the device connects, the blinking light will turn solid white.
Infinity xFi Gateway 3rd Generation
It often gets difficult to find the WPS button on the Xfinity xFi gateway 3rd generation. So, look specifically at the back of the router, and you can identify it with 2 arrows pointing toward each other. So, when you push the button, it will start blinking blue light, and once you connect any WPS-enabled device, the light will turn white, indicating whether the connection is secure
How to connect any device using the WPS button?
Before you use the WPS button, you need to configure the router and set a network password and name. After you are done with the setup, you can go for the WPS button and connect your device to the router.
Starting with the setup, you have to enable the Wi-Fi on the device which you want to connect with the router. Next, turn on the router and check whether it is ready to pair with the device. Now, press the WPS button for 3 minutes and note whether the device is connected successfully to the router.
If you want to connect any other device, then you have to check whether it is ready to connect and press the WPS button. Keep pressing the button until the device is successfully connected.
Alternatively, you can also connect the device using a cable if the WPS configuration fails.
How to configure the WPS PIN?
For setting up the WPS, you can also use the WPS PIN, and for that, you have to create the PIN on the device that is Wi-Fi enabled. You can only proceed through this step by using the WPS utility.
Now, turn on the Wi-Fi and set up the WPS. Before the set, you have to enter the gateway’s web interface. So, login and navigate to the gateway, select a connection and next proceed to Wi-Fi. This will take you to the Wi-Fi page, where you have to select “Add Wi-Fi Protected Setup Client.
Next, enable the WPS feature and under the Connection Option, click on PIN. Here, you get the option to create a pin and then select PAIR. This will connect the devices to the router.
What to do if the WPS button is not working?
If the WPS button is not working, then it is a minor technical glitch that gets resolved by applying a few tweaks.
First, check that the internet connection which you are trying to connect through is stable and that you have enabled the WPS feature through the router setting. Do remember that for the WPS button to work, you have to press down the button for at least 2 to 3 minutes.
If it still does not respond, then restart your router, disconnect the router from its cable and keep it idle for about 30 seconds. Next, plug in the cables and power on the router to check whether the WPS feature is enabled.
How do we understand that the WPS mode is enabled?
If the device is blinking blue light, then it is a clear indication that the WPS mode is enabled and the gateway is trying to create a connection between the devices. Within a few seconds, the device will get connected to the router, the lights will turn solid white, and you can start accessing the internet.


